 USA
USA CANADA
 EUROPE


How to Stiffen Craft Felt
Stiffening felt can be a quick and easy process depending on the technique you use. As there are many different methods to choose from, in this tutorial we have gone ahead and tested our top 3 stiffening felt techniques. The following techniques have been chosen with you in mind – whether you are on a time crunch, looking for an inexpensive way to stiffen your material that’s both easy and accessible, or you just want an Eco-friendly, non-toxic stiffening solution – we got you covered! The best part, these techniques work well on ALL of our craft felts. For each technique we will be using a different type of felt to show just that.
Our 3 chosen stiffening techniques are as follows:
- The quick and easy Laundry Starch Spray using our premium wool blend felt
- The inexpensive and accessible White School Glue Solution using our acrylic felt
- The Eco-friendly, non-toxic Corn Starch Solution using our rayon/viscose felt
Please note, stiffened felt will show every hole you create with a pin or needle. We recommend that any patterns should be taped, ironed, or drawn on to avoid pin holes from appearing on your projects.
Laundry Starch Spray
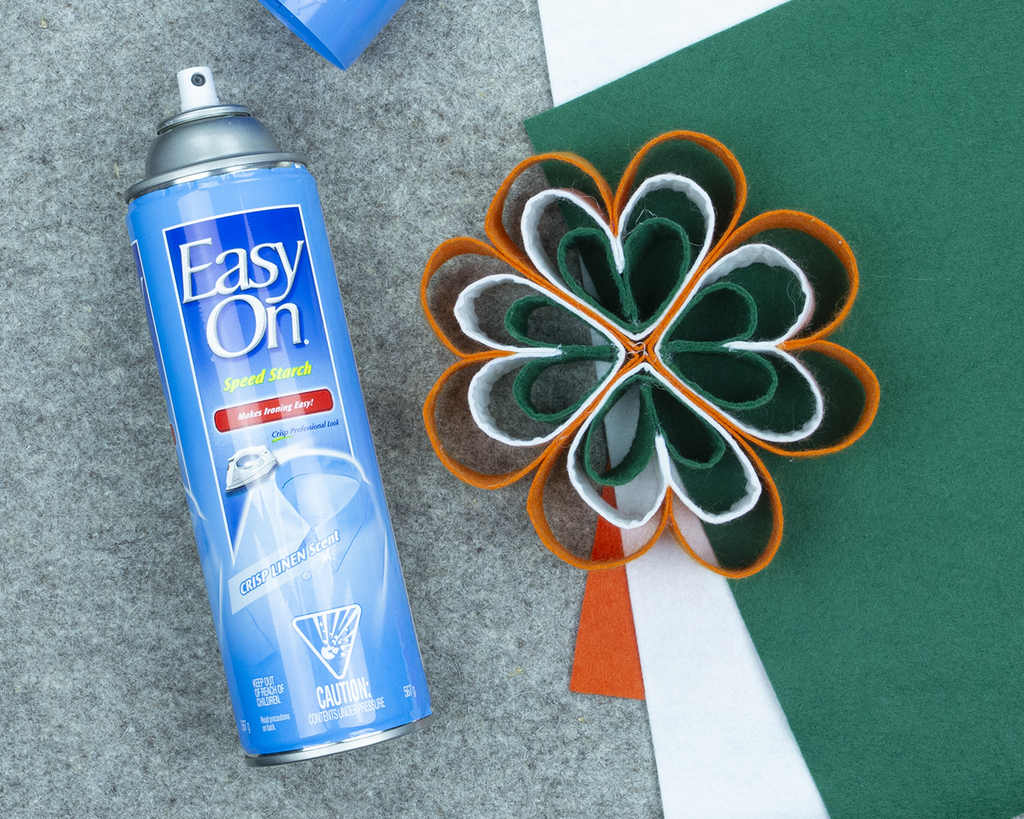
This technique is by far the fastest of the 3 where you are able to use your stiffened felt immediately after the stiffening process. It is super quick and easy with no mess involved. You can easily achieve your desired stiffness by adding multiple thin layers of starch spray. This technique would work great when creating a foundation for bead embroidery, cabochon beading, bead applique, and much more! We have also used this technique to recreate our DIY St. Patrick’s Day Shamrocks that requires stiffened felt.
DO NOT soak the felt with the spray – colors will bleed onto your buffer cloth, or if you choose not to use a buffer, the felt may stick to your iron. Be very patient with this technique. Spray a thin layer and iron flat on both sides. Repeat until desired stiffness is reached.
Materials Used:
- Felt
- Laundry starch spray
- Iron
- Ironing mat or ironing board
- Buffer cloth or old pillow case (optional)
Instructions:
Make sure to always read and follow the label for the best results when using laundry starch.
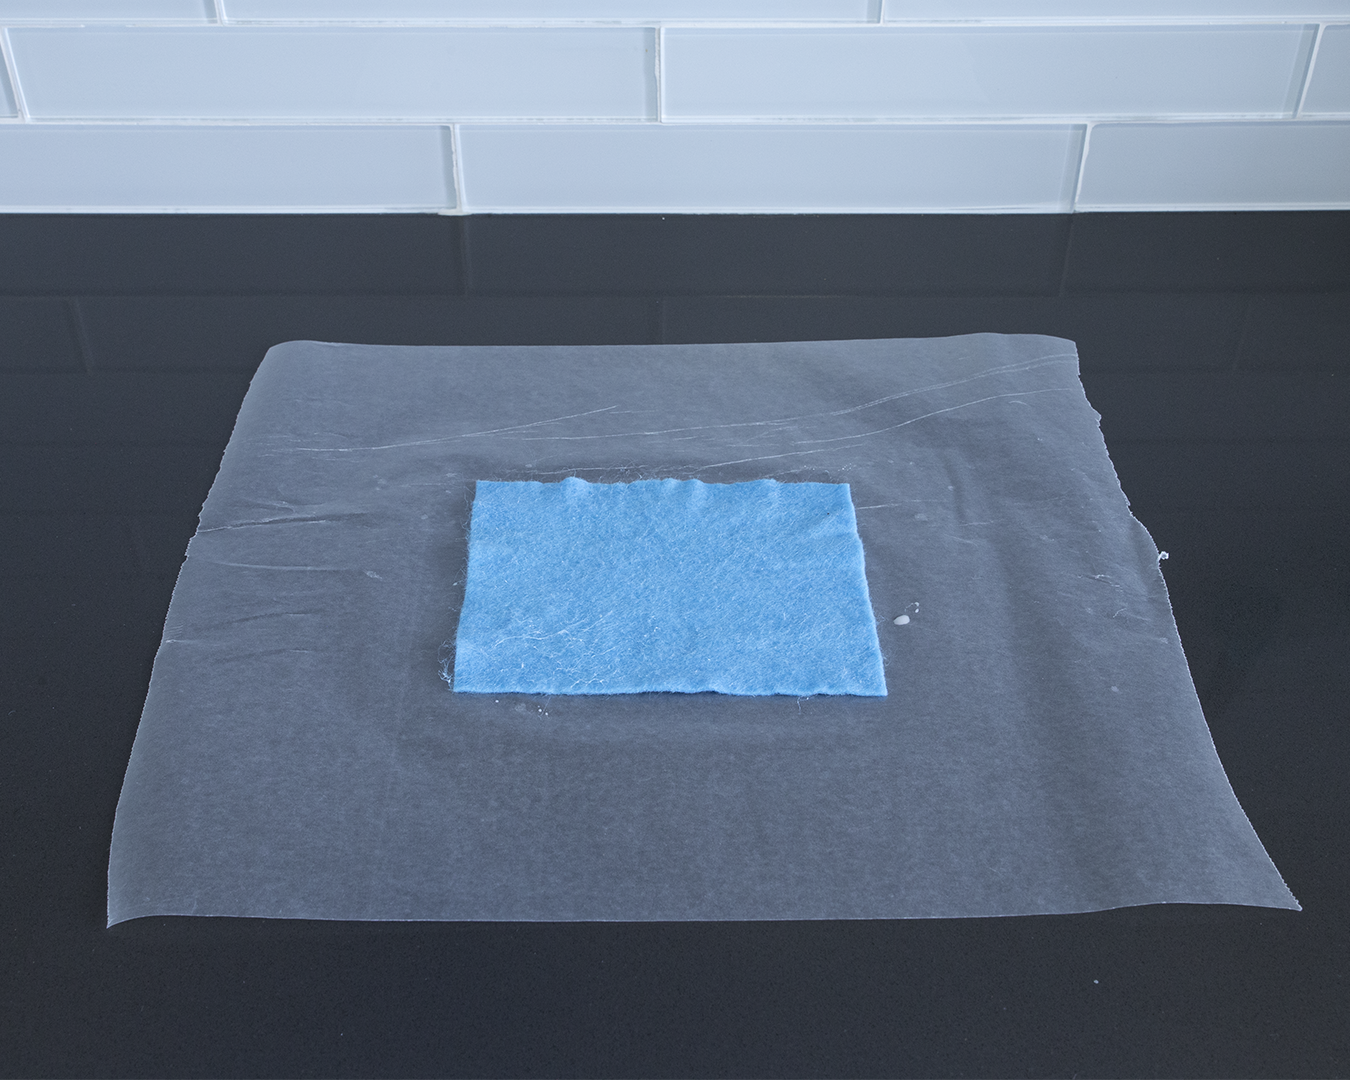
1. Grab your felt and place it on top of your pressing pad or ironing board. Spray a light layer of starch on your felt, and using your buffer cloth, iron as normal.

2. Turn over your felt and repeat step 1 on to the opposite side of the felt.
3. To reach desired stiffness, repeat the spray and iron process.


White School Glue Solution
This technique is the most popular amongst crafters and is generally used for a lot of school crafts when it come to stiffening felt. When mixing your glue solution, make sure you are using a flat bottom container or dish that has no ridges as it will be more difficult to mix.

Materials Used:
- Felt
- White school glue
- Warm water
- Old container and mixing spoon
- Wax paper
- Iron
- Ironing mat or ironing board
- Buffer cloth or old pillow case (optional)
Instructions:
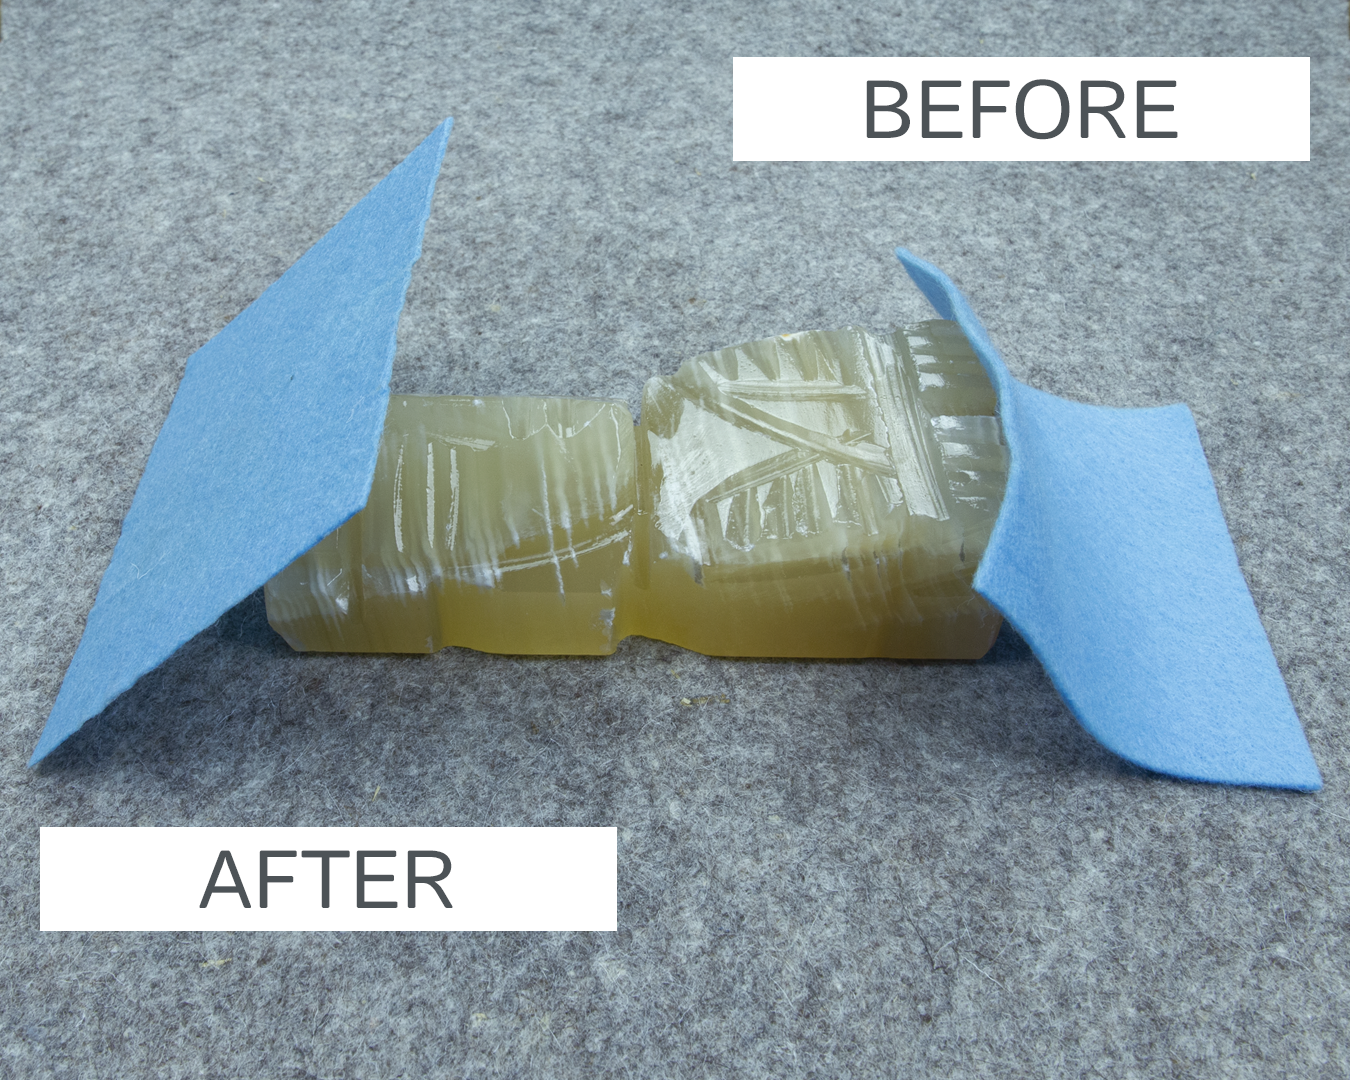
1. First, we will get our glue mixture ready. Mix 1 part glue to 3 parts warm water. Make sure to mix well until smooth – you do not want chunks of glue stuck to your felt.

2. Cut your piece of felt slightly larger than what you will need it to be for your project. The felt will shrink a bit and warp as it dries so keep this in mind.
Note: Cut your shapes out AFTER the stiffening process.
3. Submerge your felt piece into the glue mixture and make sure the whole piece gets nice and soaked. If you are using multiple colors for your stiff felt project, start with the lightest color first as the dyes may bleed slightly.

4. Remove the felt and gently wring out over the container. Do not twist or pull on the felt. A nice squeeze to remove the excess moisture is all you need. It will still be a little wet, but you want to get out as much moisture as you can to speed up the drying process.
Note: If you notice some glue chunks when taking your felt out of the glue mixture, gently rub them in to the felt.


5. Lay your felt on wax paper and smooth it out flat. Do not worry about the wrinkles as we will fix this once the felt has completely dried. The drying process will take approximately 24-48 hours depending on the drying environment and the size of your felt. Once the felt has dried completely, it should be nice and stiff.

6. Now it’s time to take care of the wrinkles. For this step we are using our wool ironing mat and an old pillow case to act as our buffer cloth. Place your felt on your ironing mat and cover with your buffer cloth or old pillow case. Now carefully iron your felt until it is nice and flat.
Note: Alternatively, you can sandwich your felt between two pieces of cloth and use an ironing board to iron out your stiffened felt.

Corn Starch Solution
Corn starch is a common food ingredient found in kitchens used to thicken sauces or soups. Using corn starch as a stiffener is the most Eco-friendly and accessible of the 3 different stiffening techniques. We highly recommend this technique when working with young children or if you are looking to create an Eco-friendly craft.

Materials Used:
- Felt
- Cold water
- Corn starch
- Small mixing bowl
- Saucepan
- Large spoon or spatula
- Iron
- Ironing mat or ironing board
- Buffer cloth or old pillow case (optional)
Instructions:
1. Boil 2 cups of water in your saucepan.
2. While you are waiting for the water to boil, mix 2-3 tablespoons of cornstarch with ½ cup of cold water in your small mixing bowl. Mix until the solution is smooth and milky.

3. When your water has come to a boil, slowly pour in the cold corn starch solution stirring constantly.


4. Continue stirring at a low boil for approximately 2 minutes. The corn starch solution is ready when it has a gravy-like texture. Once ready, remove your saucepan from the heat and turn off your element.
5. Let your corn starch solution sit and cool in the saucepan until it is hot to the touch but not burning.

6. Submerge your felt piece into the corn starch solution and massage the solution into the felt until fully saturated. If you are using multiple colors for your stiff felt project, start with the lightest color first as the dyes may bleed slightly.

7. Remove the felt from your corn starch solution and gently wring out over the saucepan. Do not twist or pull on the felt. A nice squeeze to remove the excess moisture is all you need. Make sure you get out as much moisture as possible to avoid any cloudy film forming on the felt’s surface from the corn starch.
Note: Alternatively, you can press the felt between paper towels to remove the excess liquid.

8. Lay your felt on a flat surface to dry. Do not worry about the wrinkles as we will fix this once the felt has completely dried. The drying process will take approximately 24-48 hours depending on the drying environment and the size of your felt. Once the felt has dried completely, it should be nice and stiff.
Note: The felt will lift and shrivel slightly when drying creating a crinkled surface. Alternatively, sandwich the damp felt between wax paper and place a flat, heavy object on top to help keep the felt flat while drying.


8. Now it’s time to take care of the wrinkles. For this step we are using our wool ironing mat and an old pillow case to act as our buffer cloth. Place your felt on your ironing mat and cover with your buffer cloth or old pillow case. Now carefully iron your felt until it is nice and flat.
Note: Alternatively, you can sandwich your felt between two pieces of cloth and use an ironing board to iron out your stiffened felt.
DO NOT dampen the felt once dry as you will have to start the drying process over again or the material may begin to separate.


We invite you to share your thoughts, questions, comments, or tips and tricks on these stiffening techniques. Don’t forget to show off your creations with #thefeltstore on social media. We love seeing what our customers come up with.
All are good ways of stiffening felt. I’ll be using the corn starch idea for beading.
can I use a brush to paint on a felt hat?
I love this tutorial. Can the felt be machine sewn after it has been stiffened? Thanks.
i am making felt flowers for my daughter-in-laws baby shower which method will keep the felt stiff no matter the humidity
I’m a fan of PVA, since it doesn’t attract bugs like cornstarch does. Looks like it’ll work well for the felt drawer organizers I plan to work, so thanks!
Leave a comment