 USA
USA CANADA
 EUROPE


Easter Bunny Door Hanger {Template}
It’s finally starting to feel like spring in the neighborhood, so I decided to spruce up the house for spring and Easter, starting with the front door.
Your front door is the first thing friends and family will see, so why not give them an extra-warm welcome? This cute and colorful bunny door hanger is such a fun project for you to make in one afternoon!
What you'll need:
- Craft Felt yardage
- Craft Felt sheets
- Mat board (or cardboard)
- Ribbon
- Fabric scissors to cut the felt
- Sharp Scissors (utility knife) to cut the mat board
- Hot glue gun and glue sticks
- Fabric glue for adhering felt on felt
- Template (Print US Letter Borderless)
Step 1.
Using your bunny template cut out the specified stencil quantities out of your mat board using a pair of sharp scissors.


Step 2.
Trace out your cut pieces onto the craft felt of your choice and cut them out leaving the felt approximately ½” larger. The extra overhang of the felt is so that it can easily wrap around the thickness of your board and be secured.
Step 3.
Get your hot glue gun, and wrap the excess felt around your pieces, and glue it to the back of your board. Don’t forget to pull the felt taught while you’re gluing to make a smooth surface on the front. Repeat this step for all your cut out pieces and the matching felt to go with it.

Step 4.
For the eyes, use your fabric glue to adhere the felt on felt. First you’ll want to trace out the larger part of the eye - using the Eyes + Belly stencil - onto white felt, and cut it out making it approximately 1⁄2” larger than the stencil so that it can be adhered to the back of the Eyes + Belly section.
Next, take the colored part of the bunny’s eye and adhere the bunny’s Pupil (black felt) centered on top using your fabric glue. Then adhere the Catchlight (white felt) to the eyes making sure they are on opposite sides.
Take the completed inner eye and adhere it to the outer white part of the eye. Then take your hot glue gun and glue the overhang of the eye to the back of your Eyes + Belly section.
Step 5.
Continue to hot glue each section to one another forming your bunny. • Inner Ear glued to Outer Ear.
- Nose glued to Mouth then glue to Cheeks.
- Foot and Toe Pads glued to the Feet.
- Dewlap glued to Eyes + Belly.
- Eyes + Belly glued to Body.
- Cheek glued on top.
- Then glue the Feet to the front and the Ears on the back.

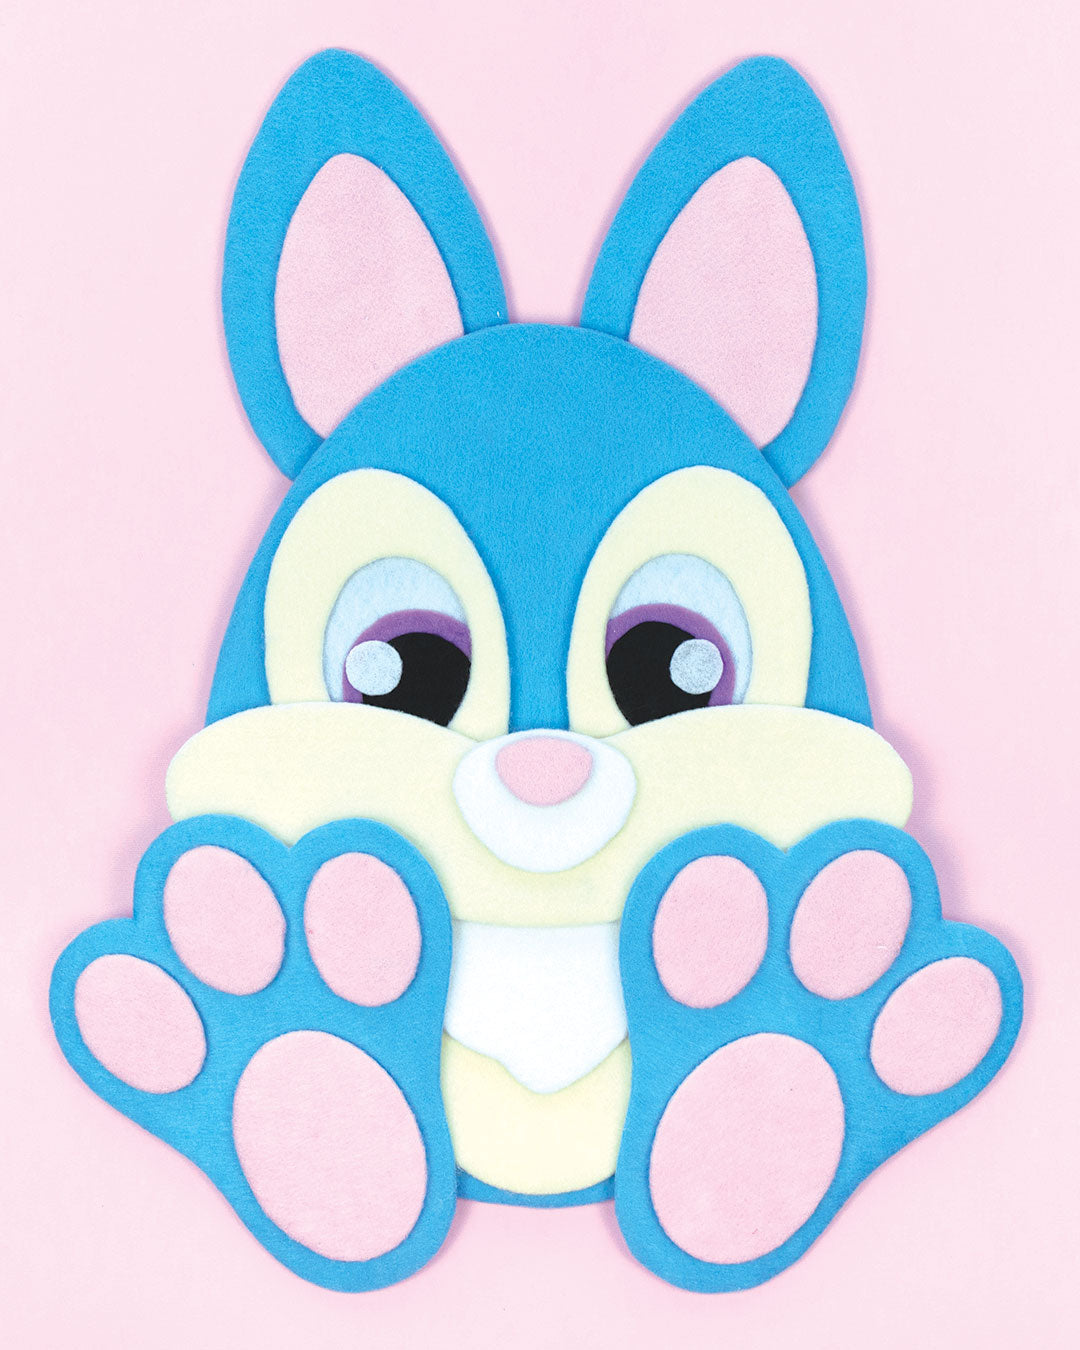
Step 6.
Take your ribbon, and hot glue it to the back of your bunny at the top between the ears. Now is the time to also add any embellishments to your bunny like a bow or eyelashes.

You’re all done! Your bunny is ready to be hung on your front door, wall or window.
We invite you to share your thoughts on this process, questions, comments or tips and tricks. Don’t forget to show off your creations with #thefeltstore on social media. We love seeing the creations our customers come up with.

Leave a comment