 USA
USA CANADA
 EUROPE


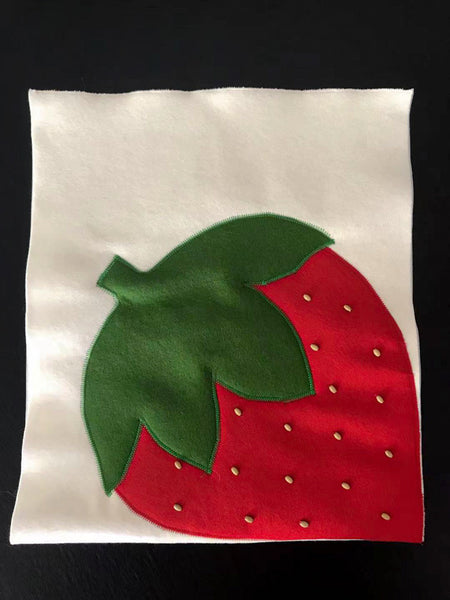
DIY Mommy and Me Strawberry Bags {Template}
Step out in style together this Mother’s Day with matching "Mommy and Me" Strawberry Bags. Made using 100% Wool Craft Felt, the "Mommy" tote bag and beaded cross-body purse are both fashionable and functional for you and your little one. Follow along for the complete step-by-step DIY tutorial for both bags.
Materials Used:
- 100% Wool Craft Felt
- Sewing thread
- Scissors
- Magnetic button
- Fabric marker
- Iron-on interfacing, medium weight
- PDF Template
Additional Materials:
- Craft wood beads for strap and seeds
- Bra hooks and eyes to secure the wood bead strap
Mommy Tote Bag
- Take the base color for your tote bag, fold it in half, and cut out the size you would like your bag to be.
- Unfold your cut felt piece and use it to trace and cut out the interfacing for the bag body. These two piece should line up perfectly.

- Iron the interfacing on to the "Mommy Bag" body.
- Hem the top to make sure the interfacing is extra secure.

- Print and cut out the strawberry "Mommy Bag" stencils from the PDF template.
- Trace the stencils onto the corresponding felt colors using a fabric marker and cut them out.
- Take your bag body and sew on the strawberry to the front half of the bag body, followed by the strawberry leaf overlapping the strawberry.


- Hand stitch the wooden seed beads onto the strawberry body.
- Cut out your strap pieces and fold them in half length wise sewing the open edge.


- Sew the straps onto the bag.
- Close up your tote by sewing the two sides together, and you’re done.

Child Cross-body Bag
- Print and cut out the strawberry "Child Bag" stencils from the PDF template.
- Trace the stencils onto the corresponding felt colors using a fabric marker and cut them out. Make sure that both pieces for the strawberry body and leaves line up with one another so that the interfacing does not show through.

- Cut the interfacing to the size of the strawberry body only.
- Iron the interfacing on to the two strawberry pieces.
- Hem the top of both strawberry body edges to make sure the interfacing is extra secure.


- Stitch the magnetic button on to the strawberry body piece.

- Sew the strawberry leaf pieces onto both strawberry body pieces. Make sure they are sewn all the way around.

- Hand stitch the wooden seed beads onto the strawberry body for extra detail.
- Complete the bag by sewing the red strawberry pieces together to the point where you would like your opening to be.

- Hand stitch the hoops onto the two opening sides of the strawberry. The next steps will lead you through creating the beaded strap.

Wooden Bead Strap
- You will need a bag of wooden beads (approx. 80g) that are 10-12mm, and hemp or cotton thread (1.5mm).
- Run a few beads through the thread.

- Run a hook through the thread.
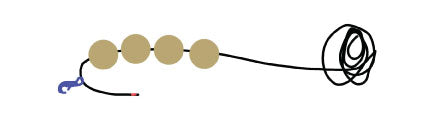
- Go back to run the beads through the thread a second time.

- Add the remaining beads through the thread until you reach your desired length (approximately 40 inches).

- Add your second hook through the thread.
- Go back to run the additional beads a second time until both thread end meet.

- Tie a sturdy knot with the thread ends, and you're done!

We invite you to share your thoughts and works on this process, questions, comments or tips and tricks. Don’t forget to show off your creations by tagging us on social media. We love seeing the creations our customers come up with!
Happy Mother's Day!
Leave a comment